With grooscript, you can create groovy code and run it in your browser or Node.js. Let’s see an example using a groovy dsl in the server, groovy templates, socket.io, and more groovy code in the client. Is just a chat application, clients login the chat, write messages and see messages from other logged users.
Server side
The server is a node.js app, starting a web server with express, and websocket server
with socket.io. To run all this you need Node.js installed, and run >npm install to install all node.js
modules needed. The server just serves
index.html page and process chat commands coming from websockets. I have created a groovy dsl to start
the server:
import org.grooscript.templates.Templates

import static chat.NodeServer.server

server {
    get('/') {
        render Templates.applyTemplate('index.gtpl')
    }
    on('login') { data, socket ->
        if (data.name && !socket.login) {
            socket.login = data.name
            socket.emit 'loginok', [name: data.name]
            socket.broadcast.emit 'loginok', [name: data.name]
        }
    }
    on('msg') { data, socket ->
        if (data.msg && socket.login) {
            socket.broadcast.emit 'msg', [from: socket.login, msg: data.msg]
        }
    }
    on('disconnect') { socket ->
        if (socket.login) {
            socket.broadcast.emit 'off', [name: socket.login]
        }
    }
}.start()
Groovy templates
I have created a little helper, in the grooscript gradle plugin, to process groovy templates. Is a incubating feature, with some limitations, but is the best time to try it :).
task chatTemplates(type: org.grooscript.gradle.TemplatesTask) {
    templatesPath = 'src/main/webapp/templates'
    templates = ['join.gtpl', 'left.gtpl', 'message.gtpl', 'index.gtpl']
    destinationFile = 'src/main/webapp/js/gstemplates.js'
}
The templates are converted to javascript, saved in the javascript file destinationFile. Adding that file,
you can apply templates with a model, returning text html code.
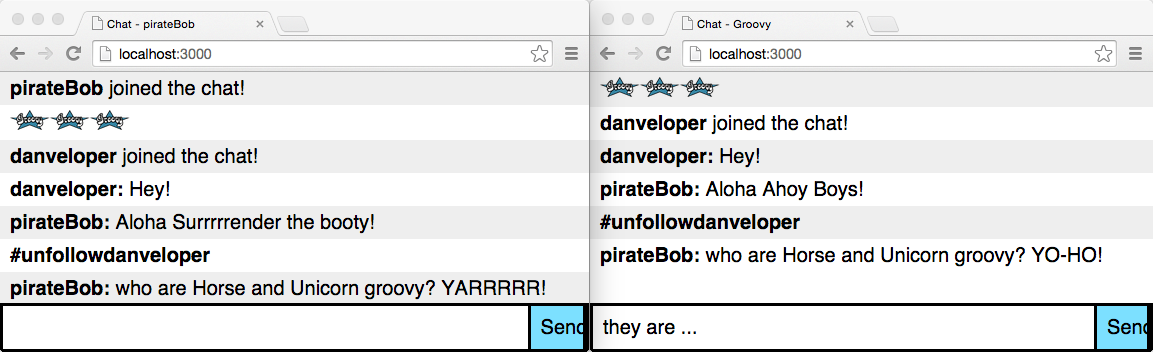
def html = Templates.applyTemplate('join.gtpl', [name: data.name])Index template is used in the server, the rest are used in the browser, to use with the messages coming from websocket. Is very easy create logic in a groovy template, for example to show messages from a pirate user:
def pirateMessages = ['YARRRRR!', 'YO-HO!', 'Ahoy Boys!', 'Surrrrrender the booty!']

li {
    b "${model.name}: "
    if (model.name.toLowerCase().contains('pirate')) {
        def randomNumber = new Random().nextInt(pirateMessages.size())
        yield "${model.msg} ${pirateMessages[randomNumber]}"
    } else {
        yield model.msg
    }
}
Client side
The index page is a groovy template coming from the server:
yieldUnescaped '<!DOCTYPE html>'
html {
    head {
        title 'Chat'
        ['js/jquery.min.js','js/grooscript.min.js','js/grooscript-tools.js',
        'js/Client.js','js/gstemplates.js','https://cdn.socket.io/socket.io-1.2.0.js'].each {
            script(type: 'text/javascript', src: it) {}
        }
        link(rel: 'stylesheet', type: 'text/css', href: 'css/chat.css')
    }

    body {
        header {
            h2 {
                a(href: 'http://grooscript.org') {
                    yield 'grooscript'
                }
                yield ' chat demo'
            }
            h4 {
                a(href: 'https://github.com/chiquitinxx/grooscript-demos') {
                    yield 'GitHub source demos'
                }
            }
        }
        section {
            div (id: 'loginArea') {
                input (id: 'login', autocomplete: 'off', autofocus: "true") {
                    button (id: 'loginButton') {
                        yield 'Login'
                    }
                }
            }
            div (id: 'chatArea') {
                ul id: 'messages'
                div (id: 'message') {
                    input (id: 'chat', autocomplete: 'off') {
                        button (id: 'sendMessage') {
                            yield 'Send'
                        }
                    }
                }
            }
        }
        script {
            yield 'Client.init();'
        }
    }
}
Jquery, grooscript, grooscript-tools, templates, socket.io are the libraries needed. The logic of the
application running in the browser is in Client.groovy. Just with Client.init() starts all in the browser:
package chat

import org.grooscript.asts.GsNative
import org.grooscript.jquery.GQuery
import org.grooscript.jquery.GQueryImpl
import org.grooscript.templates.Templates

class Client {

    def login
    def chat
    def socket
    GQuery gQuery

    Client(jQueryImpl) {
        this.gQuery = jQueryImpl
        socketInit()
        socket.on 'msg', { data ->
            gQuery('#messages').append Templates.applyTemplate('message.gtpl', [name: data.from, msg: data.msg])
        }
        socket.on 'loginok', { data ->
            if (data.name == login) {
                chatMode(login)
            }
            gQuery('#messages').append Templates.applyTemplate('join.gtpl', [name: data.name])
        }
        socket.on 'off', { data ->
            gQuery('#messages').append Templates.applyTemplate('left.gtpl', [name: data.name])
        }
        gQuery('#chatArea').hide()
        gQuery('#loginArea').show()
        bindEvents()
    }

    @GsNative
    void socketInit() {/*
        this.socket = io(window.location.hostname);
    */}

    def sendMessageClick() {
        socket.emit 'msg', [msg: chat]
        gQuery('#messages').append Templates.applyTemplate('message.gtpl', [name: login, msg: chat])
        setChat ''
    }

    def loginButtonClick() {
        socket.emit 'login', [name: login]
    }

    void chatMode(login) {
        gQuery('#chatArea').show()
        gQuery('#loginArea').hide()
        gQuery('#chat').focus()
        gQuery('title').text "Chat - $login"
    }

    static init() {
        def gQuery = new GQueryImpl()
        gQuery.onReady {
            def client = new Client(gQuery)
            gQuery.bindAllProperties(client)
            gQuery.attachMethodsToDomEvents(client)
        }
    }

    private bindEvents() {
        gQuery('#chat').keypress { event ->
            if (event.which == 13) {
                sendMessageClick()
            }
        }
        gQuery('#login').keypress { event ->
            if (event.which == 13) {
                loginButtonClick()
            }
        }
    }
}
Lot of things are done in the client, send the login, switching views between chat mode and login mode, receive login from other users, show messages from other users, disconnected users, init sockets client and listeners,… As you can see, all logic is in one groovy file.
Run all
To run this, created startChat.js file, only have to do >node js/startChat.js to run the server:
var fs = require('fs');
var gs = require('grooscript');

eval(fs.readFileSync('src/main/webapp/js/grooscript-tools.js')+'');
eval(fs.readFileSync('src/main/webapp/js/gstemplates.js')+'');
eval(fs.readFileSync('js/NodeServer.js')+'');
eval(fs.readFileSync('js/startServer.js')+'');
Now open your browser in http://localhost:3000 and the login div appears.
All the code is on github. Go, clone and play with it.
Conclusion
Is very easy create logic in groovy and see the results in the browser. Was very funny explore socket.io and groovy templates with grooscript. Groovy is better language than javascript, and if you know groovy you can create better code running in js world.
Please, if you have comments, suggestions, problems,… don’t hesitate to contact me at grooscript@gmail.com, or open an issue or feature in Github. More guides come in the future, also can find more documentation in grooscript site.